July 31, 2012

Zakk-ini Bread Basket

We are now in Week #18 of the Zakka Style Sew Along,
and it's never too late to join us.

{Visit Lindsey at  LRStitched for details.}


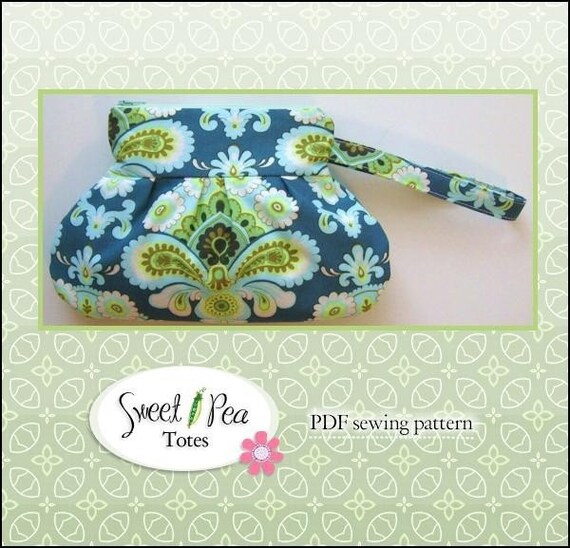
I love this week's project, contributed by 
Rachel Roxburgh of Roxy Creations.

{Rachel has a way with linen, wouldn't you agree?}


Already I've seen several versions from the sew along,
and they are all just as darling as the model from the book.

I had already started to make mine before I saw the others, which
are mostly light-colored and very cheery.
Mine is kind of dark, since I opted for my charcoal gray linen,
as the main body.  I also used a navy plaid homespun for the handles.

I can't believe I didn't think of using gingham, like 
Tamiko and Amanda did for their baskets!

{I still love it, though!}


I've seen some beautiful buttons out there, too.
For mine, I made a covered button to match the handles.

{One of the most fun steps was braiding the little loop from string!}


I love this print from Recess by American Jane,
for the interior.  

{I also love the way the handles tie into a sweet little love knot.}

What's that inside the bag, you may ask?

Why, it's a loaf of homemade zucchini bread,
and as your reward for sticking with me, 
I'm going to share how to make it, right now.

{You may find the printable version of the recipe for
here at allrecipes.com.}

Start with a nice big zucchini...
I live in Pennsylvania, and our local gardens
are always bursting with zucchini.

{Like my Dad always said, I don't have a garden, but I cultivate friends with gardens.}


Use a grater to shred the zucchini into a bowl.

{Just shred the whole thing, and freeze the rest in plastic bags, with 2 cups in each bag.  This particular zucchini will make 8 loaves of bread!}


I love to collect all my ingredients and pretend I'm on a cooking show.
Here's all the stuff needed for this recipe.


Mix the eggs, oil and sugar in a large mixing bowl.

{You may use a mixer, or just stir everything together for this recipe.}

Stir in the zucchini and vanilla...


And then the dry ingredients, which have been sifted together.


Pour into two prepared loaf pans.


When they are baked, they have a wonderful, slightly chewy crust, 
and the inside is tender, with tiny green flecks of zucchini peel.

{The first time one of my sons tasted it, when he was very small,
he said, "Mmmmm...I'll have some more of that bikini bread, please!}


Now,I must say that when I pictured this bread basket, 
I thought it would be a lot larger...

{"Is it bigger than a bread basket?"}


Although it's not big enough to hold a regular loaf of bread,
it is just right for pesenting homemade goodies,
which makes it even more appealing!


Pin It

July 27, 2012

A Peacock Wedding

Once upon a time, there was a beautiful bride,
with four lovely bridesmaids to attend her.

The bridesmaids gowns were a brilliant shade of teal called Mediterranean...
we call it Peacock in my real-life workplace.

{But that's another tale...don't get me started.}


{Source:  Pinterest}

Each gown came with a fabric stole, 
made from the same teal fabric as the dresses.
The bridesmaids felt certain that they would NOT want to 
wear stoles for the August wedding.

{Can you blame them?}


{Source:  Pinterest}

Someone suggested making little purses from the stoles,
and I was asked to make them!

{Yay!!!}

I knew right away that this Sweet Pea Totes pattern,
would be a perfect choice!


I made up all four of the wristlets from the silky taffeta peacock fabric,
which has a fantastic, rich sheen and wonderful texture.

{I lined the fabric with Pellon ShapeFlex 101SF,
and it made perfect pleats.}


For the interiors, I chose four different prints to match.
I used one print for the pocket and the other for the lining.

{I switched up the prints, so that all four coordinated,
but each was unique. These are from Paula Prass and Jennifer Paganelli.}


For the interiors and the pocket, I used Pellon 987F fusible fleece interfacing.
The wristlets are soft, but hold their shape, even when empty.

{Man, I love that stuff...I buy it by the bolt!}


This pattern is fabulous!!!
I've used it many times and it's fun every step of the way.

{Here are some of my favorites...}


I bought a bunch of colorful zippers,
because they add some "zip" to these great bags! 


{I got mine from Zipit on Etsy.}


I do follow the fabulous well-written pattern exactly,
except with two modifications I like to make.


1.
I prefer some extra shaping to the bottom of the bags,
so I make darts in the corners.


2.
Secondly, I LOVE putting a skinny shoulder strap
on my bags, instead of using them
as a wristlet.
They can be carried on the shoulder, or even cross-body.


{When I go to an amusement park, I can tuck mine inside my shirt
for the roller coaster rides!}


I generally make a matching key fob, too...
so I made up a few for the bridal party.


{You just can't have too many of these key fobs!}


{I have a few of these purses for sale in my shop on Etsy,
or you can always contact me if you want me to sew something just for you!}


I had some more of the peacock fabric left...
and I used it to make up a drawstring bag
from this tutorial by Jeni of In Color Order.


I love the lively accent fabrics, once again by Jennifer Paganelli...
It's for the bridal dance, so of course
it's got to rock!


And for the final chapter in this storybook wedding...
the bride needed a pretty purse, too, don't you think?


How lovely is this?


{Made from elmstreetlife's Bow Clutch Tutorial 
that I've already posted about here.}


The lining is from a Jennifer Paganelli's print called Matt's Tux.


{I do so love names that sound like they match the occasion!}


Wishing the bride and groom, their family and friends
a beautiful wedding day!


Pin It

July 26, 2012

Zakka Style Week #17 - Delightful Linen Bag

I'm so happy to present this edition
of the Zakka Style Sew Along...
the Delightful Linen Bag!

{Aptly named, in my humble opinion!}

{LRStitch has been our lovely hostess...come along and join now!}
This pretty little project was contributed by Mette Robl

{Her blog is filled with beauty and inspiration.  Just what you're looking for in a blog, right?}


This was a quick-to-make project,
and I actually spent more time planning it then sewing it.

I had a finished piece of cross-stitch that I made a long time ago.
It had a decidedly "country" feel to it.

{We live in a neighborhood called Apple Hill.}


My sister Susie gave me some gorgeous creamy fabrics from
Lakehouse Dry Goods - Penelope, like this one.

{I promised myself NOT to hoard them!}

{Still available at Shabby Fabrics!}


Paris Flea Market by 3 Sisters for Moda
was the first fabric line I ever fell 
head over heels for, and I bought yardage from the entire collection,
which is now out of print.
I decided to stop the hoarding and use a bit of those, too.

{It's so old, I couldn't even find an image to show you!}

Normally I am really fussy about matching a "mood" throughout my project.
Could I mix Country with Shabby Chic successfully?

I looked again at the photo from Mette's version of the little bag,
which combines a traditional rose cross-stitch with vintage lace,
appliqued ribbon, a funky lavender cotton print, and a
bright green tiny floral binding.
A funky wooden button with a leather closure
finishes it all off.

And it works!

I knew right away that I wanted to risk it all,
and mix shades, moods, textures...
Here's my own version.


The back is plain, to show off my beautiful button fabric.

{Thanks, Susie, for that and for the key charm!}


I have just one minor complaint about this project:
the binding was nearly impossible to work with,
and I actually cut mine at 1 1/4" 
instead of the 1" that was recommended.

{It was soooooo narrow for a double-folded binding!}

The last line of this chapter mentioned using the bag for postcards.
I just happen to have a little collection of vintage postcards!
Want to see some of them?

Some are Christmas...


Some are Easter and Valentine's Day.


I even have one that was an advertising trade card for thread!
My uncle had it in his store for years, until I admired it, and he gave it to me!

{He's sweet that way!}


Look at the little girl on her swing made with thread!


And before I go, I'd like to share my very favorite Christmas postcard,
which was mailed in 1923 to my grandparents,
from my grandma's grandmother!


{The handwriting reaches out to me...and the love goes on and on...}


Thank you, Mette, for this project!


Pin It